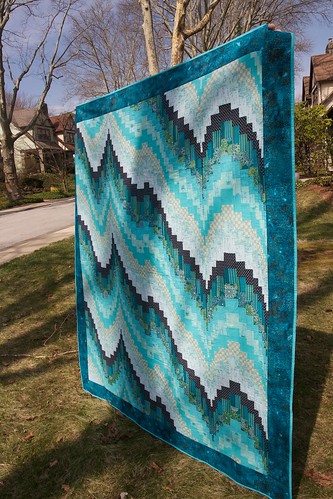
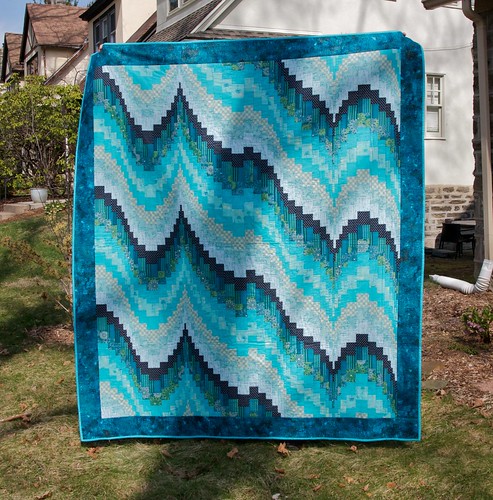
I decided for the challenge that I was going to take on one of my quilting resolutions for the year, which was to make a Bargello-style quilt. I had been interested in making one for a while and when I saw Marlene make one for our solids challenge, I really got inspired.
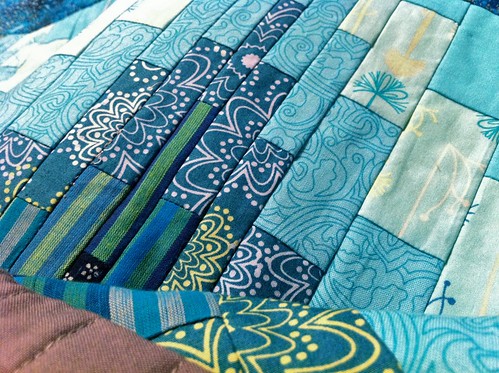 |
| A closeup of the finished quilt. The narrow strip towards the left is 1/4 inch wide! |
The process of making the Bargello quilt starts with designing the "curve." This step was harder than I thought it would be - I think I redid the curve design 3 or 4 times until I was happy with it. Basically, you use graph paper with very small boxes and draw a curve, then you convert that curve into strip "widths" that are required to make the curve look the way you want, using one of your fabrics as the a focal point. Then, because I'm crazy like that, I transferred all the information into Excel and made a spreadsheet to do all my calculations. The quilt is then constructed as follows:
1. 2.5-inch strips are cut the width of all the fabrics. In my case, I had 9 different fabrics and I cut six strips of each.
2. The strips are sewn together into "color runs" - my color run was 3 repeats of the 9 fabrics, so 27 strips in total. I had to create two of these color runs, each was the width of the fabric (about 42").
3. Fold each "color run" over on itself and sew the bottom to the top so that you form a tube.
4. Prepare the batting and backing (basted together as you normally would do, except without the top).
5. Cut strips from the tubes perpendicular to the direction of the original strips (so each of the newly cut strips has 27 small rectangles of fabric). The way I did it was to cut each strip right before it was sewn onto the quilt, not all at once at the beginning. It's easier to keep track of this way.
6. Open the strip either at a seam or halfway between seams - each new strip is opened at a different location so that you get the "curve" - my spreadsheet was used so that I would know what width to cut and basically where to open each strip. The widths of the strips I cut ranged from 0.75 inch (3/4 inch) to 2.75 inches. The narrowest strips end up as only 1/4 inch in the quilt! Those were a beast to work with!
7. Sew the first strip directly onto the backing and batting, starting in the CENTER of the quilt.
8. Work your way to one side of the quilt or the other, laying each new strip front sides together onto the last strip and sewing it down onto the batting/backing. In this way, you are quilting the quilt as you piece the top, and the quilting lines actually are hidden inside the seams.
9. Once finished with one half, you start at the center and go towards the other side.
10. At the end, add borders if you want. Add any additional quilting on top of the quilt you may want and then bind the quilt as usual.
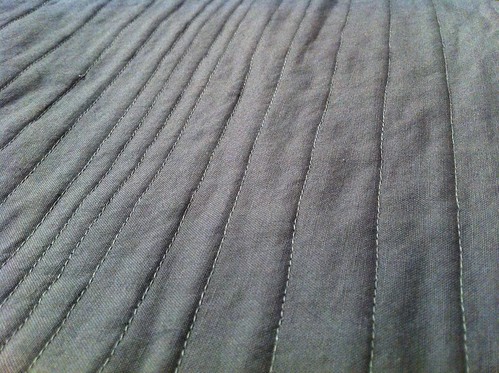 |
| The quilting lines only show on the back. I chose not to add more quilting on the front because it would cross these lines. |
Wow, that's pretty complicated when written out like that, but once you get going it's really not too bad. And the final result is quite striking, I think. So what do you all think? Are you going to try a Bargello sometime? If I do another one, it probably won't be for a while.
I still LOVE this quilt. I think you were robbed, you should have won Project Modern! And my head is spinning from the amount of work that goes into one of these. Congrats on a gorgeous quilt.
ReplyDeleteSuch a beautiful quilt. Great work, I love the design, the colors, everything. You wanna know when my birthday is?? ;)
ReplyDeleteHaha, thanks guys. I'm just happy I finished one of my resolutions so early in the year! It's also great to hear that other people whose work I admire (like you guys) like what I did.
ReplyDeleteYou did a great job!! I love this quilt. The curve kind of reminds me of Chinese ink drawings of mountains...
ReplyDeleteOk seriously...If you host another crafting party this may leave your house with me...just sayin'!
ReplyDeleteI'm inspired. Thanks for posting this!
ReplyDelete